This tutorial is a follow-up (or addendum, if you will) to Headless Raspberry Pi Zero Setup with Ethernet from Ground Zero on Windows 8 which shows how to get a Pi Zero running and connected to a network without using a monitor, keyboard or mouse. In this follow-up tutorial, we are going to address getting a Pi Zero running with only a Wifi dongle. This is only ONE way to do this. Your mileage may vary.

Equipment You’ll Need
- Your Windows 8 PC with SD interface or adapter
- Pi Zero $5 buy
- Blank 8GB microSDHC w/Adapter $7.50 buy
- Tiny OTG Adapter $2.95 buy
- Wifi Dongle Adafruit $11.95 or Amazon $9
- 5V 2.4A Switching Power Supply w/ 20AWG 6’ MicroUSB Cable $7.95 or equivalent buy
- (Optional) Adafruit Pi Protector buy
Software You’ll Need
- Paragon ExtFS for Windows download
Initial Setup
First, follow steps 1 - 4 in the Install Raspbian Jessie Lite on 8GB microSDHC Card section of my previous Headless Raspberry Pi Zero Setup post. Then, come back and perform the steps below for setting the wifi SSID and password. You can then jump back to the original post and continue with the Boot the Pi Zero and Connect with PuTTY section.
Setting the Wifi SSID and Password
Once we have the Raspbian Jessie Lite image on our SDHC card, we can edit the _wpasupplicant.conf file using ExtFS for Windows. The basic steps for this process were derived the Pi Help topic post: Setting Wifi Up via the Command Line. So, follow these easy steps to make the appropriate modification(s) to this file:
Download and install ExtFS for Windows. After I installed ExtFS on my Windows 8 box, a driver icon showed up in the system tray. Although this tool can create and modify partitions (and other things), we’re just using it to access the file system and modify a file.
With the SDHC Card plugged into your reader, double-click on the ExtFS icon that is in your system tray. You should see something like this:
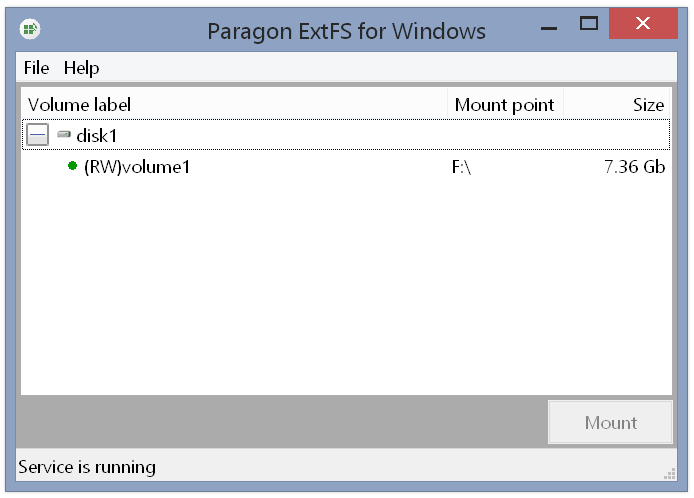
ExtFS, if properly installed, should recognize the Ext volume and automatically mount as a drive letter in Windows Explorer. You can select the volume and mount/un-mount. When you do, it will appear/disappear as a drive letter. As you can see from the above screen capture, the SDHC card has mounted the Ext volume to drive letter [F:]. The “raw” SDHC card will show up in Explorer as a separate drive letter; mine was drive [E:].
BONUS: Since we have the SDHC card mounted as a drive, we can take this opportunity to quickly do large file transfers for the Pi to access later. (Tip provided by Daniel Buentello)
We’re now going to modify the file [\etc\wpa_supplicant\wpa_supplicant.conf]. In Windows Explorer, go to the [\etc\wpa_supplicant] folder and open the [wpa_supplicant.conf] file with an appropriate editor. I use the Atom Editor. When I open the file for editing in Atom, the filed contents look like this:
123country=GBctrl_interface=DIR=/var/run/wpa_supplicant GROUP=netdevupdate_config=1I don’t care to make any changes here. We want to go to the bottom of the file (after the
update_config=1line) and add the following (obviously, modifying it to contain your specific SSID and password):1234network={ssid="your-ssid"psk="your-password"}Now, just save and close the file.
Eject the SDHC card from your system. I didn’t have to un-mount the volume in ExtFS before ejecting the SDCH card as this is a setting in ExtFS.
Now you can pickup with the Boot the Pi Zero and Connect with PuTTY section from the original post. Good luck and I hope this helps you get your headless Pi Zero up and running with a Wifi dongle.